2-19. EXPLOSION HAZARDS
a. Severe explosions and fires can result from heating, welding, and cutting containers which are not free of combustible solids, liquids, vapors, dusts, and gases. Containers of this kind can be made safe by following one of the methods described in paragraphs 2-22 through 2-26. Cleaning the container is necessary in all cases before welding or cutting.
WARNING
Do not assume that a container that has held combustibles is clean and safe until proven so by proper tests. Do not weld in places where dust or other combustible particles are suspended in air or where explosive vapors are present. Removal of flammable material from vessels and/or containers may be done either by steaming out or boiling.
b. Flammable and explosive substances may be present in a container because it previously held one of the following substances:
(1) Gasoline, light oil, or other volatile liquid that releases potentially hazardous vapors at atomspheric pressure.
(2) An acid that reacts with metals to produce hydrogen.
(3) A nonvolatile oil or a solid that will not release hazardous vapors at ordinary temperatures, but will release such vapors when exposed to heat.
(4) A combustible solid; i. e., finely divided particles which may be present in the form of an explosive dust cloud.
c. Any container of hollow body such as a can, tank, hollow compartment in a welding, or a hollow area on a casting, should be given special attention prior to welding. Even though it may contain only air, heat from welding the metal can raise the temperature of the enclosed air or gas to a dangerously high pressure, causing the container to explode. Hollow areas can also contain oxygen-enriched air or fuel gases, which can be hazardous when heated exposed to an arc or or flame. Cleaning the container is necessary in all cases before cutting or welding.
2-20. USING THE EXPLOSIMETER
a. The explosimeter is an instrument which can quickly measure an atomsphere for concentrations of flammable gases and vapors.
b. It is important to keep in mind that the explosimeter measures only flammable gases and vapors. For example, an atomsphere that is indicated non-hazardous from the standpoint of fire and explosion may be toxic if inhaled by workmen for some time.
c. Model 2A Explosimeter is a general purpose combustible gas indicator. It will not test for mixtures of hydrogen, acetylene, or other combustibles in which the oxygen content exceeds that of normal air (oxygen-enriched atomspheres). Model 3 Explosimeter is similar except that it is equipped with heavy duty flashback arresters which are capable of confining within the combustion chambers explosions of mixtures of hydrogen or acetylene and oxygen in excess of its normal content in air. Model 4 is designed for testing oxygen-acetylene mixtures and is calibrated for acetylene.
d. Testing Atomspheres Contaminated with Leaded Gasoline. When an atomsphere contaminated with lead gasoline is tested with a Model 2A Explosimeter, the lead produces a solid product of combustion which, upon repeated exposure, may develop a coating upon the detector filament resulting in a loss of sensitivity. To reduce this possibility, an inhibitor-filter should be inserted in place of the normal cotton filter in the instrument. This device chemically reacts with the tetraethyl lead vapors to produce a more volatile lead compound. One inhibitor-filter will provide protection for an instrument of eight hours of continuous testing.
CAUTION
Silanes, silicones, silicates, and other compounds containing silicon in the test atomsphere may seriously impair the response of the instrument. Some of these materials rapidly "poison" the detector filament so that it will not function properly. When such materials are even suspected to be in the atmosphere being tested, the instrument must be checked frequently (at least after 5 tests). Part no. 454380 calibration test kit is available to conduct this test. If the instrument reads low on the test gas, immediately replace the filament and the inlet filter.
e. Operation Instructions. The MSA Explosimeter is set in its proper operating condition by the adjustment of a single control. This control is a rheostat regulating the current to the Explosimeter measuring circuit. The rheostat knob is held in the "OFF" position by a locking bar. This bar must be lifted before the knob can be turned from "OFF" position.
To test for combustible gases or vapors in an atomsphere, operate the Model 2A Explosimeter as follows:
(1) Lift the left end of the rheostat knob "ON-OFF" bar and turn the rheostat knob one quarter turn clockwise. This operation closes the battery circuit. Because of unequal heating or circuit elements, there will be an initial deflection of the meter pointer. The meter pointer may move rapidly upscale and then return to point below "ZERO", or drop directly helm "ZERO".
(2) Flush fresh air through the instrument. The circuit of the instrument must be balanced with air free of combustible gases or vapors surrounding the detector filament. Five squeezes of the aspirator bulb are sufficient to flush the combustion chamber. If a sampling line is used, an additional two squeezes will be required for each 10 ft (3m) of line.
(3) Adjust rheostat knob until meter pointer rests at "ZERO". Clockwise rotation of the rheostat knob causes the meter pointer to move up scale. A clockwise rotation sufficient to move the meter pointer considerably above "ZERO" should be avoided as this subjects the detector filament to an excessive current and may shorten its life.
(4) Place end of sampling line at, or transport the Model 2A Explosimeter to, the point where the sample is to be taken.
(5) Readjust meter pointer to "ZERO" if necessary by turning rheostat knob.
(6) Aspirate sample through instrument until highest reading is obtained. Approximately five squeezes of the bulb are sufficient to give maximum deflection. If a sampling line is used, add two squeezes for each 10 ft (3 m) of line. This reading indicates the concentration of combustible gases or vapors in the sample.
The graduations on the scale of the indicating inter are in percent of the lower explosive limit. Thus, a deflection of the meter pointer between zero and 100 percent shins how closely the atmosphere being tested approaches the minimum concentration required for the explosion. When a test is made with the instrument and the inter pointer is deflected to the extreme right side of the scale and remains there, the atmosphere under test is explosive.
If the meter pointer moves rapidly across the scale, and on continued aspiration quickly returns to a position within the scale range or below "ZERO", it is an indication that the concentration of flammable gases or vapors may be above the upper explosive limit. To verify this, immediately aspirate fresh air through the sampling line or directly into the instrument. Then, if the meter pointer moves first to the right and then to the left of the scale, it is an indication that the concentration of flammable gas or vapor in the sample is above the upper explosive limit.
When it is necessary to estimate or compare concentrations of combustible gases above the lower explosive limit a dilution tube may be employed. See paragraph 2-20 f (1).
The meter scale is red above 60 to indicate that gas concentrations within that range are very nearly explosive. Such gas-air mixtures are considered unsafe.
(7) To turn instrument off: Rotate rheostat knob counterclockwise until arrow on knob points to "OFF". The locking bar will drop into position in its slot indicating that the rheostat is in the "OFF" position.
NOTE
When possible, the bridge circuit balance should be checked before each test. If this is not practical, the balance adjustment should be made at 3-minute internals during the first ten minutes of testing and every 10 minutes thereafter.
f. Special Sampling Applications
(1) Dilution tube. For those tests in which concentrations of combustible gases in excess of liner explosive limit concentrations (100 percent on instrument inter) are to be compared, such as in testing bar holes in the ground adjacent to a leak in a buried gas pipe, or in following the purging of a closed vessel that has contained f flammable gases or vapors, a special air-dilution tube must be used. Such dilution tubes are available in 10:1 and 20:1 ratios of air to sample, enabling rich concentrations of gas to be compared.
In all tests made with the dilution tube attached to the instrument, it is necessary that the instrument be operated in fresh air and the gaseous sample delivered to the instrument through the sampling line in order to permit a comparison of a series of samples beyond the normal range of the instrument to determine which sample contains the highest concentration of combustible gases. The tube also makes it possible to folbw the progress of purging operation when an atomsphere of combustibles is being replaced with inert gases.
(2) Pressure testing bar holes. In sane instances when bar holes are drilled to locate pipe line leaks, a group of holes all containing pure gas may be found. This condition usually occurs near a large leak. It is expected that the gas pressure will be greatest in the bar hole nearest the leak. The instrument may be used to locate the position of the leak by utilizing this bar hole pressure. Observe the time required for this pressure to force gas through the instrument sampling line. A probe tube equipped with a plug for sealing off the bar hole into which it is inserted is required. To remove the flow regulating orifice from the instrument, aspirate fresh air through the Explosimeter and unscrew the aspirator bulb coupling. Adjust the rheostat until the meter pointer rests on "ZERO".
The probe tube is now inserted in the bar hole and sealed off with the plug. Observe the time at which this is done. Pressure developed in the bar hole will force gas through the sampling line to the instrument, indicated by an upward deflection of the meter pointer as the gas reaches the detector chamber.
Determine the time required for the gas to pass through the probe line. The bar hole showing the shortest time will have the greatest pressure.
When the upward deflection of the meter pointer starts, turn off the instrument, replace the aspirator bulb and flush out the probe line for the next test.
2-21. PREPARING THE CONTAINER FOR CLEANING
CAUTION
Do not use chlorinated hydrocarbons, such as trichloroethylene or carbon tetrachloride, when cleaning. These materials may be decomposed by heat or radiation from welding or cutting to form phosgene. Aluminum and aluminum alloys should not be cleaned with caustic soda or cleaners having a pH above 10, as they may react chemically. Other nonferrous metals and alloys should be tested for reactivity prior to cleaning.
NOTE
No container should be considered clean or safe until proven so by tests. Cleaning the container is necessary in all cases before welding or cutting.
a. Disconnect or remove from the vicinity of the container all sources of ignition before starting cleaning.
b. Personnel cleaning the container must be protected against harmful exposure. Cleaning should be done by personnel familiar with the characteristics of the contents.
c. If practical, move the container into the open. When indoors, make sure the room is well ventilated so that flammable vapors may be carried away.
d. Empty and drain the container thoroughly, including all internal piping, traps, and standpipes. Removal of scale and sediment may be facilitated by scraping, hammering with a nonferrous mallet, or using a nonferrous chain as a srubber. Do not use any tools which may spark and cause flammable vapors to ignite. Dispose of the residue before starting to weld or cut.
e. Identify the material for which the container was used and determine its flammability and toxicity characteristics. If the substance previously held by the container is not known, assure that the substance is flammable, toxic, and insoluble in water.
f. Cleaning a container that has held combustibles is necessary in all cases before any welding or cutting is done. This cleaning may be supplemental by filling the container with water or an inert gas both before and during such work.
g. Treat each compartment in a container in the same manner, regardless of which comparment is be welded or cut.
2-22. METHODS OF PRECLEANING CONTAINERS WHICH HAVE HELD FLAMMABLE LIQUIDS
a. General. It is very important for the safety of personnel to completely clean all tanks and containers which have held volatile or flammable liquids. Safety precautions cannot be over-emphasized because of the dangers involved when these items are not thoroughly purged prior to the application of heat, especially open flame.
b. Accepted Methods of Cleaning. Various methods of cleaning containers which have held flammable liquids are listed in this section. However, the automotive exhaust and steam cleaning methods are considered by military personnel to be the safest and easiest methods of purging these containers.
2-23. AUTOMOTIVE EXHAUST METHOD OF CLEANING
WARNING
Head and eye protection, rubber gloves, boots, and aprons must be worn when handling steam, hot water, and caustic solutions. When handling dry caustic soda or soda ash, wear approved respiratory protective equipment, long sleeves, and gloves. Fire resistant hand pads or gloves must be worn when handling hot drums.
The automotive exhaust method of cleaning should be conducted only in well-ventilated areas to ensure levels of toxic exhaust gases are kept below hazardous levels.
CAUTION
Aluminum and aluminum alloys should not be cleaned with caustic soda or cleaners having a pH above 10, as they may react chemically. Other nonferrous metals and alloys should be investigated for reactivity prior to cleaning.
a. Completely drain the container of all fluid.
b. Fill the container at least 25 percent full with a solution of hot soda or detergent (1 lb per gal of water (0.12 kg per 1)) and rinse it sufficiently to ensure that the inside surface is thoroughly finished.
c. Drain the solution and rinse the container again with clean water.
d. Open all inlets and outlets of the container.
e. Using a flexible tube or hose, direct a stream of exhaust gases into the container. Make sure there are sufficient openings to allow the gases to flow through the container.
f. Allow the gases to circulate through the container for 30 minutes.
g. Disconnect the tube from the container and use compressed air (minimum of 50 psi (345 kPa)) to blow out all gases.
h. Close the container openings. After 15 minutes, reopen the container and test with a combustible gas indicator. If the vapor concentration is in excess of 14 percent of the lower limit of flammability, repeat cleaning procedure.
2-24. STEAM METHOD OF CLEANING
WARNING
Head and eye protection, rubber gloves, boots, and aprons must be worn when handling steam, hot water, and caustic solutions. When handling dry caustic soda or soda ash, wear approved respiratory protective equipment, long sleeves, and gloves. Fire resistant hand pads or gloves must be worn when handling hot drums.
The automotive exhaust method of cleaning should be conducted only in well-ventilated areas to ensure levels of toxic exhaust gases are kept below hazardous levels.
CAUTION
Aluminum and aluminum alloys should not be cleaned with caustic soda or cleaners having a pH above 10, as they may react chemically. Other nonferrous metals, and alloys should be investigated for reactivity prior to cleaning.
a. Completely drain the container of all fluid.
b. Fill the container at least 25 percent full with a solution of hot soda, detergent, or soda ash (1 lb per gal of water (0.12 kg per 1)) and agitate it sufficiently to ensure that the inside surfaces are thoroughly flushed.
NOTE
Do not use soda ash solution on aluminum.
c. Drain the solution thoroughly.
d. Close all openings in the container except the drain and filling connection or vent. Use damp wood flour or similar material for sealing cracks or other damaged sections.
e. Use steam under low pressure and a hose of at least 3/4-in. (19.05 mm) diameter. Control the steam pressure by a valve ahead of the hose. If a metal nozzle is used at the outlet end, it should be made of nonsparkinq material and should be electrically connected to the container. The container, in turn, should be grounded to prevent an accumulation of static electricity.
f. The procedure for the steam method of cleaning is as follows:
(1) Blow steam into the container, preferably through the drain, for a period of time to be governed by the condition or nature of the flammable substance previously held by the container. When a container has only one opening, position it so the condensate will drain from the same opening the steam inserted into. (When steam or hot water is used to clean a container, wear suitable clothing, such as boots, hood, etc., to protect against burns.)
(2) Continue steaming until the container is free from odor and the metal parts are hot enough to permit steam vapors to flow freely out of the container vent or similar opening. Do not set a definite time limit for steaming containers since rain, extreme cold, or other weather conditions may condense the steam as fast as it is introduced. It may take several hours to heat the container to such a temperature that steam will flow freely from the outlet of the container.
(3) Thoroughly flush the inside of the container with hot, preferably boiling, water.
(4) Drain the container.
(5) Inspect the inside of the container to see if it is clean. To do this, use a mirror to reflect light into the container. If inspection shows that it is not clean, repeat steps (1) through (4) above and inspect again. (Use a nonmetal electric lantern or flashlight which is suitable for inspection of locations where flammable vapors are present.)
(6) Close the container openings. In 15 minutes, reopen the container and test with a combustible gas indicator. If the vapor concentration is in excess of 14 percent of the lower limit of flammbility, repeat the cleaning procedure.
2-25. WATER METHOD OF CLEANING
a. Water-soluble substances can be removed by repeatedlv filling and draining the container with water. Water-soluble acids, acetone, and alcohol can be removed in this manner. Diluted acid frequently reacts with metal to produce hydrogen; care must be taken to ensure that all traces of the acid are removed.
b. When the original container substance is not readily water-soluble, it must be treated by the steam method or hot chemical solution method.
2-26. HOT CHEMICAL SOLUTION METHOD OF OF CLEANING
WARNING
Wear head and eye protection, rubber gloves, boots, and aprons when handling steam, hot water, and caustic solutions. When handling dry caustic soda or soda ash, wear approved respiratory protective equipment, long sleeves, and gloves. Wear fire resistant hand pads or gloves to handle hot drums.
CAUTION
Aluminum and aluminum alloys should not be cleaned with caustic soda or cleaners having a pH above 10, as they may react chemically. Other nonferrous metals and alloys should be investigated for reactivity prior to cleaning.
a. The chemicals generally used in this method are trisodium phosphate (strong washing powder) or a commercial caustic cleaning compound dissolved in water to a concentration of 2 to 4 oz (57 to 113 g) of chemical per gallon of water.
b. The procedure for the hot chemical solution method of cleaning is as follows:
(1) Close all container openings except the drain and filling connection or vent. Use damp wood flour or similar material for sealing cracks or other damaged sections.
(2) Fill the container to overflowing with water, preferably letting the water in through the drains. If there is no drain, flush the container by inserting the hose through the filling connection or vent. Lead the hose to the bottom of the container to get agitation from the bottom upward. This causes any remaining liquid, scum, or sludge to be carried upward and out of the container.
(3) Drain the container thoroughly.
(4) Completely dissolve the amount of chemical required in a small amount of hot or boiling water and pour this solution into the container. Then fill the container with water.
(5) Make a steam connection to the container either through the drain connection or by a pipe entering through the filling connection or vent. Lead the steam to the bottom of the container. Admit steam into the chemical solution and maintain the solution at a temperature of 170 to 180°F (77 to 82°C). At intervals during the steaming, add enough water to permit overflying of any volatile liquid, scum, or sludge that may have collected at the top. Continue steaming to the point where no appreciable amount of volatile liquid, scum, or sludge appears at the top of the container.
(6) Drain the container.
(7) Inspect the inside of the container as described in paragraph 2-24 f (5). If it is not clean, repeat steps (4) thru (6) above and inspect again.
(8) Close the container openings. In 15 minutes, test the gas concentration in the container as described in paragraph 2-24 f (6).
c. If steaming facilities for heating the chemical solution are not available, a less effective method is the use of a cold water solution with the amount of cleaning compound increased to about 6 oz (170 g) per gal of water. It will help if the solution is agitated by rolling the container or by blowing air through the solution by means of an air line inserted near the bottom of the container.
d. Another method used to clean the container is to fill it 25 percent full with cleaning solution and clean thoroughly, then introduce low pressure steam into the container, allowing it to vent through openings. Continue to flow steam through the container for several hours.
2-27. MARKING OF SAFE CONTAINERS
After cleaning and testing to ensure that a container is safe for welding and cutting, stencil or tag it. The stencil or tag must include a phrase, such as "safe for welding and cutting," the signature of the person so certifying, and the date.
2-28. FILLING TREATMENT
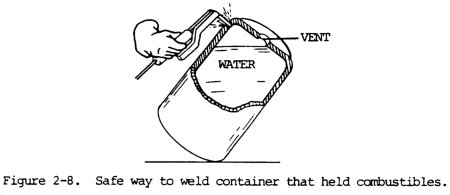
It is desirable to fill the container with water during welding or cutting as a supplement to any of the cleaning methods (see fig. 2-8). Where this added precaution is taken, place the container so that it can be kept find to within a few inches of the point where the work is to be done. Make sure the space above the water level is vented so the heated air can escape from the container.
2-29. PREPARING THE CLEAN CONTAINER FOR WELDING OR CUTTING--INERT GAS TREATMENT
a. General. Inert gas may be used as a supplement to any of the cleaning methods and as an alternative to the water filling treatment. If sufficient inert gas is mixed with flammable gases and vapors, the mixture will come non-flammable. A continuous flow of steam may also be used. The steam will reduce the air concentration and make the air flammable gas mixture too lean to burn. Permissible inert gases include carbon dioxide and nitrogen.
b. Carbon Dioxide and Nitrogen.
(1) When carbon dioxide is used, a minimum concentration of 50 percent is required, except when the falmmable vapor is principally hydrogen, carbon monoxide, or acetylene. In these cases, a minimum concentration of 80 percent carbon dioxide is required. Carbon dioxide is heavier than air, and during welding or cutting operations will tend to remain in containers having a top opening.
(2) When nitrogen is used, the concentrations should be at least 10 percent greater than those specified for carbon dioxide.
(3) Do not use carbon monoxide.
c. Procedure. The procedure for inert gas, carbon dioxide, or nitrogen treatment is as follows:
(1) Close all openings in the container except the filling connection and vent. Use damp wood flour or similar material for sealing cracks or other damaged sections.
(2) Position the container so that the spot to be welded or cut is on top. Then fill it with as much water as possible.
(3) Calculate the volume of the space above the water level and add enough inert gas to meet the minimum concentration for nonflammability. This will usually require a greater volume of gas than the calculated minimum, since the inert gas may tend to flow out of the vent after displacing only part of the previously contained gases or vapors.
(4) Introduce the inert gas, carbon dioxide, or nitrogen from the cylinder through the container drain at about 5 psi (34.5 kPa). If the drain connection cannot be used, introduce the inert gas through the filling opening or vent. Extend the hose to the bottom of the container or to the water level so that the flammable gases are forced out of the container.
(5) If using solid carbon dioxide, crush and distribute it evenly over the greatest possible area to obtain a rapid formation of gas.
d. Precautions When Using Carbon Dioxide. Avoid bodily contact with solid carbon dioxide, which may produce "burns". Avoid breathing large amounts of carbon dioxide since it may act as a respiratory stimulant, and, in sufficient quantities, can act as an asphyxiant.
e. Inert Gas Concentration. Determine whether enough inert gas is present using a combustible gas indicator instrument. The inert gas concentration must be maintained during the entire welding or cutting operation. Take steps to maintain a high inert gas concentration during the entire welding or cutting operation by one of the following methods:
(1) If gas is supplied from cylinders, continue to pass the gas into the container.
(2) If carbon dioxide is used in solid form, add small amounts of crushed solid carbon dioxide at intervals to generate more carbon dioxide gas.
Authorization Letter